
EKS Image Hardening: What Is It?
EKS The practice of safeguarding AMIs based on specific benchmarks is known as image hardening. Standards from CIS levels 1 and 2 are used as a baseline. CIS (Center for Internet Security) level 1 and 2 standards refer to a set of security benchmarks and best practices developed by the Center for Internet Security. These standards provide guidelines and recommendations for securing various components of an IT infrastructure, including operating systems, applications, and cloud services.
Why is it required?
EKS Image Hardening is required for several key reasons. Firstly, it enables organizations to meet compliance requirements by securing AMIs based on CIS level 1 and 2 standards. This ensures adherence to regulatory standards and demonstrates a commitment to maintaining a robust security posture. Secondly, EKS Image Hardening enhances the overall security of an Amazon EKS environment by reducing the attack surface. Implementing recommended security measures mitigates the risk of vulnerabilities, data breaches, and unauthorized access.Lastly, it safeguards against emerging threats by continuously updating and hardening AMIs based on the latest security benchmarks. This proactive approach ensures organizations stay ahead of evolving cyber threats, keeping their cloud infrastructure resilient and protected
Prerequisites
Before starting EKS Image Hardening, ensure you have Packer and Make installed on your local computer. For EKS image files, contact us here. Download the cis-audit.sh and hardened-ami-service-account.zip files from the provided link. Unzip the EKS image file to obtain the necessary EKS-hardened AMI folder. These prerequisites are essential for a smooth EKS Image Hardening process, ensuring the secure configuration of your AMIs.
Phase 1 – Creating an AMI: Enhancing Security for Your Amazon EKS Environment
To begin the process of strengthening the security of your Amazon EKS environment through image hardening, follow these steps:
By carefully following these steps, you lay the groundwork for reinforcing the security of your Amazon EKS environment, ensuring that your AMIs are on the path to becoming fortified against potential threats.
Phase 2: Building an Instance from the AMI
To proceed with the creation of an instance from the chosen AMI, follow the below steps:
Phase 3: Expanding /var/lib/docker: Unlocking Storage Potential
To expand the capacity of /var/lib/docker and accommodate your evolving needs, follow these steps:
$ df -h
Expected Output:
Filesystem Size Used Avail Use% Mounted ondevtmpfs 1.9G 0 1.9G 0% /devtmpfs 1.9G 0 1.9G 0% /dev/shmtmpfs 1.9G 364K 1.9G 1% /runtmpfs 1.9G 0 1.9G 0% /sys/fs/cgroup/dev/nvme0n1p1 8.0G 1.7G 6.4G 21% /tmpfs 1.9G 4.0K 1.9G 1% /tmp/dev/nvme1n1p4 589M 19M 528M 4% /home/dev/nvme1n1p1 1.2G 442M 655M 41% /vartmpfs 1.9G 0 1.9G 0% /var/tmp/dev/nvme1n1p2 1.2G 33M 1.1G 4% /var/log/dev/nvme1n1p5 1.2G 260K 1.1G 1 % /var/lib/docker/dev/nvme1n1p3 1.2G 480K 1.1G 1% /var/log/audittmpfs 388M 0 388M 0% /run/user/1000
This command provides information about storage utilization, helping you assess the need for expansion.
3. Note Available Memory: Take note of the available memory within /var/lib/docker, as this will be crucial for comparing the size after expansion.
4. Increase Partition Size: Execute the following command to increase the partition size:
$ sudo growpart /dev/ nvme1n1 5
Expected output:
CHANGED: partition=5 start=8808448 old: size=2516992 end=11325440 new: size=33134559 end=41943007
$ sudo resize2fs /dev/ nvme1n1p5
resize2fs 1.42.9 (28-Dec-2013)Filesystem at /dev/nvme1n1p5 is mounted on /var/lib/docker; on-line resizing requiredold_desc_blocks = 1, new_desc_blocks = 2The filesystem on /dev/nvme1n1p5 is now 4141819 blocks long.
5. This command expands the partition size to enable more storage allocation for /var/lib/docker.

6. Verify Increased Size: Run the command below once again to confirm the increased size of /var/lib/docker:
$ df -h
Expected output:
Filesystem Size Used Avail Use% Mounted ondevtmpfs 1.9G 0 1.9G 0% /devtmpfs 1.9G 0 1.9G 0% /dev/shmtmpfs 1.9G 364K 1.9G 1% /runtmpfs 1.9G 0 1.9G 0% /sys/fs/cgroup/dev/nvme0n1p1 8.0G 1.7G 6.4G 21% /tmpfs 1.9G 4.0K 1.9G 1% /tmp/dev/nvme1n1p4 589M 19M 528M 4% /home/dev/nvme1n1p1 1.2G 442M 655M 41% /vartmpfs 1.9G 0 1.9G 0% /var/tmp/dev/nvme1n1p2 1.2G 33M 1.1G 4% /var/log/dev/nvme1n1p5 16G 260K 15G 1% /var/lib/docker/dev/nvme1n1p3 1.2G 516K 1.1G 1% /var/log/audittmpfs 388M 0 388M 0% /run/user/1000
This step ensures that the expansion was successful and that /var/lib/docker now has the desired additional capacity.
7. Confirm the Expansion: Finally, double-check the increased size of /var/lib/docker to validate that the storage expansion process was completed successfully, meeting your requirements.
By following these simple steps, you effectively expand the storage capacity of /var/lib/docker within your Amazon EKS environment, empowering it to accommodate your growing needs with ease.
Phase 4: Copying cis-audit.sh File to Your EC2 Instance: Bridging Local and Cloud Environments
To seamlessly transfer the cis-audit.sh file from your local machine to the EC2 instance, need to follow simple steps:
By using these easy steps, you seamlessly bridge the gap between your local machine and the EC2 instance, copying the cis-audit.sh file and making it readily available within the instance. This sets the stage for further actions and ensures a smooth continuation of the Amazon EKS Image Hardening process.
Phase 5: Remediation: Solidifying Your AMI with Essential Fixes
To effectively remediate any vulnerabilities discovered during the Amazon EKS Image Hardening process, carefully follow these steps:
By precisely following these steps, you actively address vulnerabilities within your AMI, applying essential fixes and strengthening its security posture. This ensures that your Amazon EKS environment is safeguarded against potential threats, providing a resilient foundation for your cloud-native applications.
Automation for Remediation: Streamlining the Hardening Process
To expedite the remediation process and eliminate the need for manual intervention, an efficient automation solution has been developed. This section outlines the steps for leveraging the bash script automation to swiftly address failing checks:
By following these streamlined steps, you leverage the power of automation to expedite the remediation process, ensuring a robust and secure environment for your Amazon EKS instances.
Packer Automation: Simplifying AMI Creation
To streamline the AMI creation process and ensure adequate hardening, the powerful tool called Packer is employed. Packer enables the creation of AMIs from a source template, allowing for the inclusion of multiple scripts to strengthen the image. Follow these steps to automate the process using Packer:
By following these streamlined steps, you leverage the capabilities of Packer to automate the creation of AMIs. This ensures a standardized and efficient approach to hardening your Amazon EKS images, enabling you to establish a secure foundation for your cloud-native applications.
Next Step for Automation: Streamlining /var/lib/docker Expansion
Having acknowledged the manual nature of phase 3, which involves expanding the /var/lib/docker library, the logical progression is to automate this process entirely. By doing so, we can enhance the overall efficiency and reliability of the expansion.
The next crucial step is to automate phase 3, eliminating the need for manual intervention when expanding the /var/lib/docker library.
Creating an EKS AMI with version 1.23 involves a few straightforward steps:
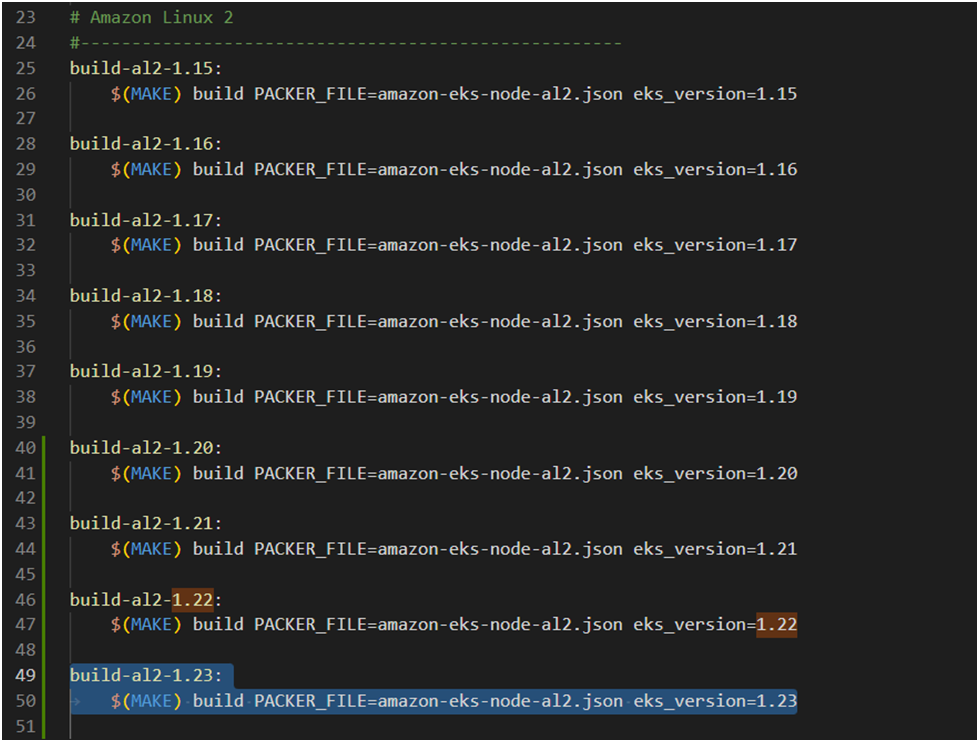
- Save the file and execute the command below in your terminal:
$ make build-al2-1.23
By following these steps, you can effortlessly create an EKS AMI with the desired version 1.23.Passing Checks Analysis:
Here’s an overview of the analysis conducted on the passing checks for CIS benchmark level 1 and level 2 standards:
By continuously striving to increase the number of passing checks, the overall security of the AMI has been significantly enhanced.In summary, for the Kubernetes cluster to be more secure, Amazon EKS images must be hardened. Leveraging CIS benchmark standards alongside automation tools such as bash scripts and packers streamlines the image hardening process, saving valuable time and effort. By adopting a proactive approach through regular monitoring and updates, organizations can effectively shield their applications and data from potential threats, fostering a secure environment for their EKS deployments.
Written by Bhupali Tambekar, Co-Founder & CTO, Comprinno